Añadir nuevo comentario
Installing Drupal 8 on Windows and SQL Server
This post explains how to install Drupal 8 on Internet Information Services (IIS) and MS SQL Server using PHP7 with advanced performance settings. It is aimed at understading the different pieces that compose the environment needed to run Drupal on Windows and intended to audiences that have at least an intermediate level of confidence with Windows, IIS and SQL Server.
It is based on the original (and now outdated) Installind Drupal on Windows and SQL Server post, and has been updated for Drupal 8, PHP7 and other changes in Drupal.
- Frequently Asked Questions
- Drupal is Coded in PHP, what is that?
- The IDE: Visual Studio + PHP Tools
- How PHP works on Windows (and how to install it)
- Serving PHP scripts from IIS
- Preparing IIS for Clean URL's
- Enabling Wincache and SQL Server PDO extensions
- Making SSL work
- Preparing the Database
- Composer and GIT for Windows
- Installing Drupal
- Applying patches
- MS SQL Custom functions
- High performance Drupal: Wincache
- High performance Drupal: Couchbase
- HIgh performance Drupal: Tideways
- NetPhp
- Debugging with Xdebug, Visual Studio and PHP Tools (pending)
- Calling .Net code from PHP
- What to do next
Frequently Asked Questions
Can I run Drupal 8 on Windows with Apache?
- You can, but this is not production ready. This setup is usually recommened for users developing on Windows but that are going to deploy their applications on Linux machines running Apache (or nginx).
- The only production ready thing on Windows is IIS (Internet Information Services) - that comes free bundled with any version of Windows, even personal and home editions.
Can I run Drupal 8 on Azure?
- Azure has multiple flavours of their service. You can perfectly run Drupal 8 on azure on both Windows or Linux based backends, as well as MySQL or MS SQL Server as a storage backend. Currently you can perfectly run Drupal 8 on Azure PaaS offering "Azure Apps" using Azure SQL as a storage backend.
Is deploying/developing on Windows + SQL Server more expensive?
- Cloud virtual windows machines are about 15% more expensive, but you can easily save that money in operation costs. The best Windows VPS in terms of price per performance is Vultr or Azure. Other providers such as AWS consider supporting Windows not a key part of their business model and thus penalize the use of Windows based software with an over price.
- SQL Server has a free edition that is full featured but has a 10GB per database limit. You won't even get close to this limit on regular websites. And you get a business ready database engine that is much more powerful, fast and scalable than any other thing on the market.
- Visual studio is now free.
- Visual studio has excelent PHP development plugins such as PHP Tools For Visual Studio
- Visual studio has excelent Web Development extensions such as Web Essentials.
What is the WAMP stack?
- Something you want to avoid because the only production ready web server on windows is IIS. If you want to use apache (or niginx) I recommend moving to Linux. WAMP is very common between hobbyists because it is usually deployed with one click installer packages.
Drupal is coded in PHP, what is that?
PHP is a server-side scripting language designed for web development but also used as a general-purpose programming language.
PHP code is usually processed by a PHP interpreter, which is usually implemented as a web server's native module or a Common Gateway Interface (CGI) executable.
Ther official PHP site to get Windows builds is windows.php.net. You can check out new releases and detailed progress in the official changelog for PHP7.
PHP has historically had very bad fame as an inconsistent, broken and unafe programming language. But with the advent of PHP7, everything changed converting PHP7 in a platform ready to support business projects.
The IDE: Visual Studio + PHP Tools
Before you start working on Drupal you will need an IDE. The IDE is the tool that makes working with PHP productive. Autocomplete, quality assurance, sintax highliting, etc...
The best tool to work with PHP on Windows is Visual Studio with the PHP Tools Add-On. You can get Visual Studio for free with the Visual Studio Community Edition. After installing Visual Studio make sure that you install the plugins required for a productive Web Development experience:
You can download a copy of PHP Tools from Devsense.
How PHP works on Windows (and how to install it)
Important: Stay away from the PHP platform installer.
If you intend to run PHP on Windows take the time to deploy it manually step by step and understand how everything works.
For the scope of this article, you need to know that PHP scripts are interpreted, and that on windows this interpretation is performed by an executable application that you can download from here.
In PHP7 you should stick to x64 Non Thread Safe.
Download the binaries and drop them anywhere in your system (ex. D:\PHP\).
This is the folder where we will stare what is called the PHP runtime.
The binaries folder has all the required DLL's for PHP to work. PHP7 is compiled for Windows using VC14 so you might need to also install Visual C++ Redistributable for Visual Studio 2015.
The behaviour of the PHP runtime settings are managed through the php.ini file. The downloaded package has a demo "php.ini - development", just rename it to "php.ini" so that the PHP runtime can boot.
You are now ready to run PHP scripts!
Drop these lines in a d:\hello.php file:
<?php
  print phpinfo();
?>
And run your first script with:
d:\PHP\php.exe d:\hello.php
This is not exactly how web page serving works, but is helpful in clarfying the underlying communication setup between IIS and PHP. The function phpinfo returns an HTML formated string that contains information about the current PHP environment: version, settings, what extensions are loaded and their settings, etc. This is not very helpful shown through the console, but will make more sense when we access that script from a web server.
Serving PHP scripts from IIS
Internet Information Services is a Windows feature that will turn any Windows OS into a Web Server. This feature comes turned off by default, and there are plenty of guides on the internet on how to install and enable IIS:
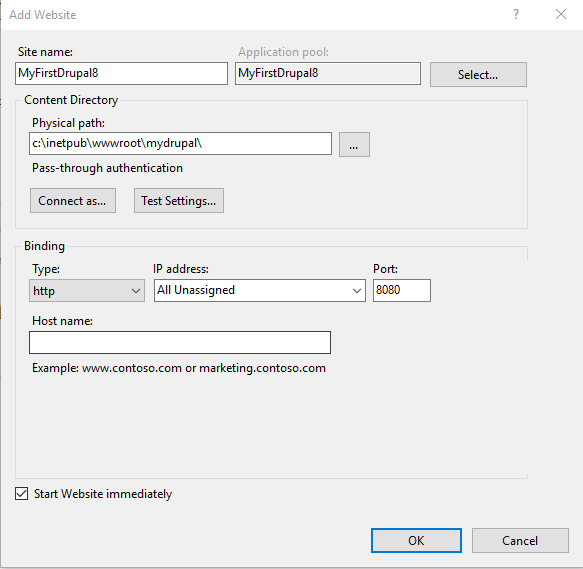
Start by setting up a new empty website in IIS on port 8080 that points to
d:\inetpub\wwwroot\mydrupal\
this is where our web files will be sitting.
Drop in it the hello.php script we made before.
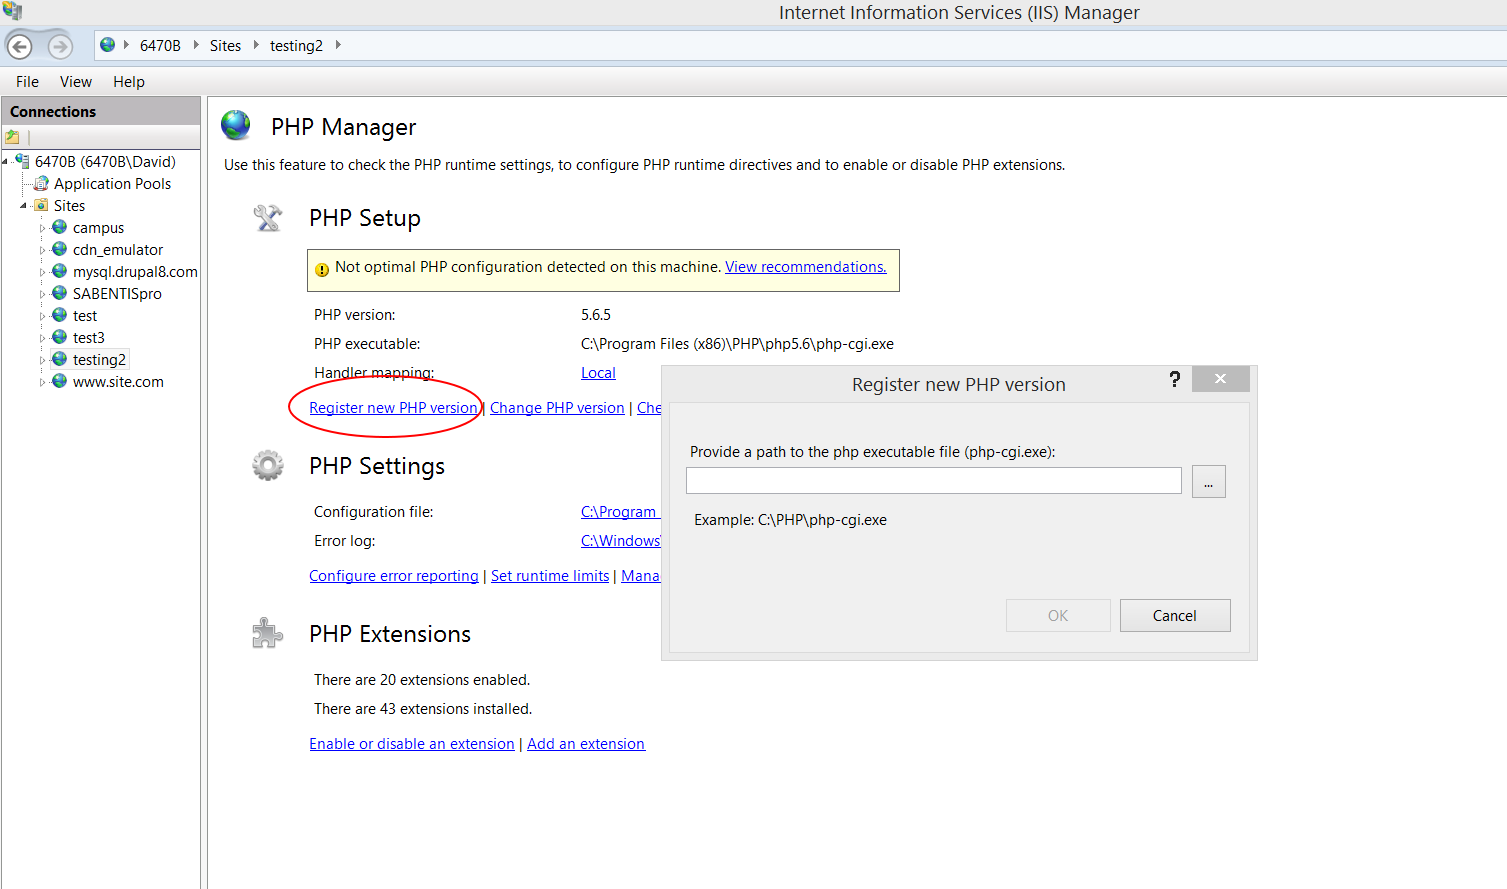
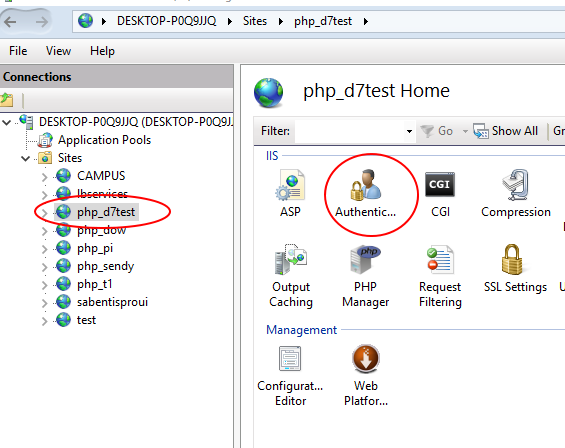
To make your life easier, there is an IIS complement you can install that provides a visual interface to configure basic PHP settings in IIS wen applications, the PHP Manager for IIS. This manager allows for easy registration of the PHP handler, along with other basic PHP settings.
As of the 4th January 2016 the PHP Manager for IIS installer provided officialy by MS does not install on Windows 10. You will find a working installer in this post.
Use this link for IIS 10 and this one for IIS 8.5.
Once installed you will see the PHP Manager icon in the IIS configuration pane for all your sites.
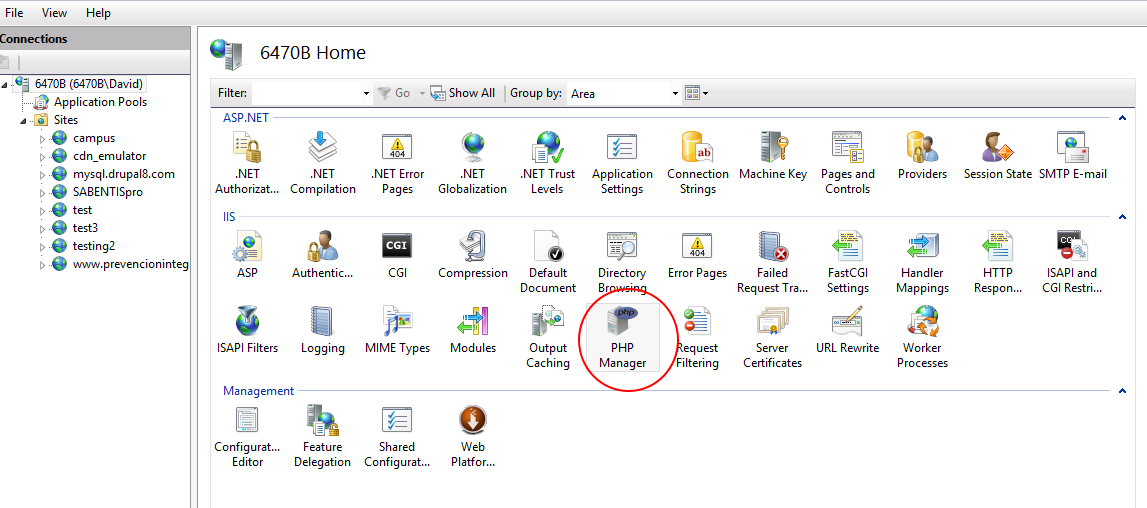
Connecting IIS and PHP is a piece of cake, just open the PHP Manager in the UI and navigate to the php-cgi.exe executable:
Well...it's not actually that easy, having a good PHP deployment that you understand and ready for production requires an article in itself, but for now this will suffice. This article from Microsoft has more in-depth details about how to setup IIS and PHP.
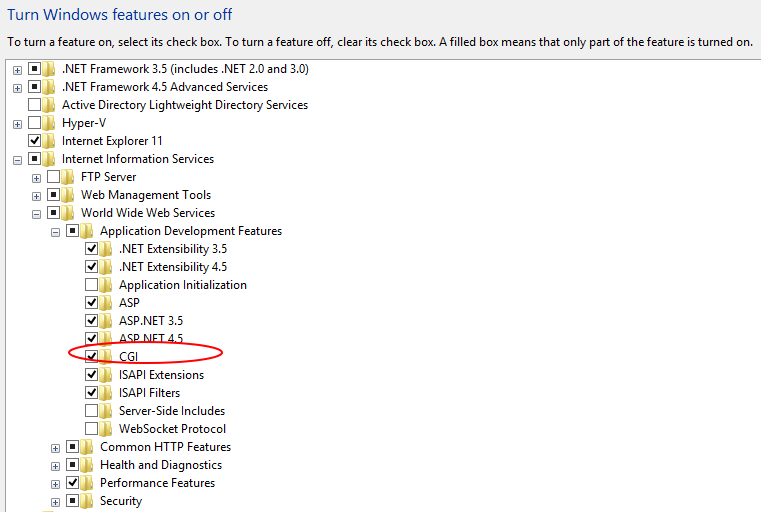
Note that for this to work you must have the FastCgiModule installed in IIS. This is an optional component when you install windows (Add or Remove Features), and it is actually called CGI in the installation UI.
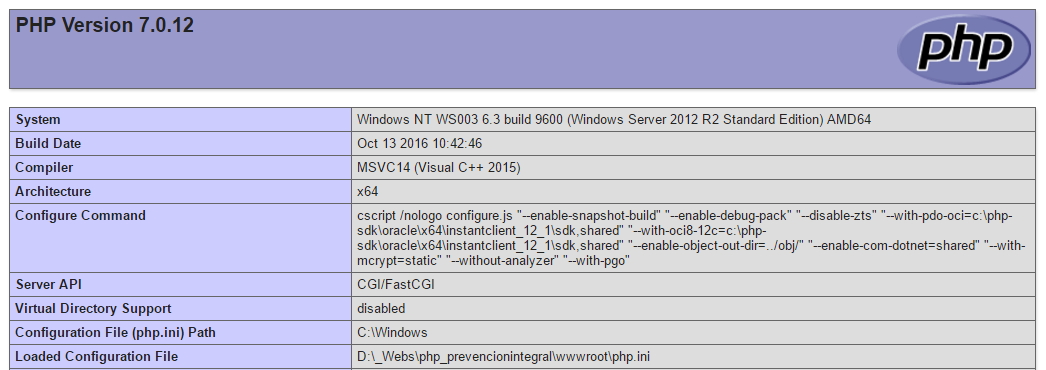
You are now ready to serve your first PHP script, just browse to http://localhost:8080/hello.php, and you should bee seing something like this:
Preparing IIS for clean URL's
Drupal works in such a way that all (well, nearly all) requests are forwarded to the index.php script, and Drupal uses a query string parameter to retrieve the information about what the user is really trying to access.
By default, Drupal uses and generates URLs for your site's pages that look like "http://www.example.com/?q=node/83". With so-called clean URLs this would be displayed without the "?q=" as "http://www.example.com/node/83".
The style of URLs using "?q=" can be hard to read, and may even prevent some search engines from indexing all the pages of your site. In Drupal 7 you can turn clean URL's on and off, but in Drupal 8 clean URL's are enabled by default and cannot be turned off.
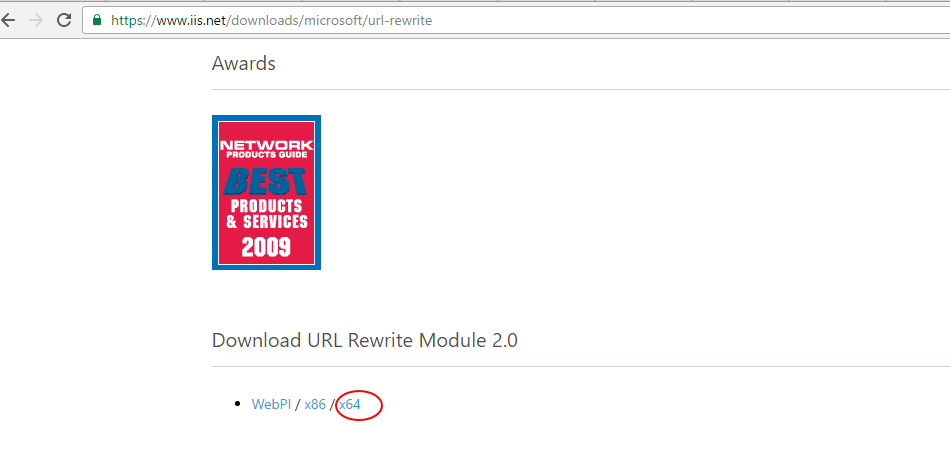
The magic behind clean URL's is Microsoft's URL Rewrite Module in IIS. This modules allows the user to define a set of application level URL rewriting rules, so that you can have custom transformations to URL request before they reach your application. The IIS module can be downloaded from here. The download links can be found at the end of the page:
Once installed, rewriting rules are setup in your web.config or through a friendly UI in IIS. In any case, you don't have to bother any futher because the web.config that comes with Drupal Core has already the rewriting rules that Drupal uses in it.
You can read more about the url rewrite module here.
Enabling Wincache and SQL Server PDO extensions
We mentioned before that PHP can be extended by the means of compiled extensions. These extensions are configured through the PHP.ini file.
For a basic setup you will at least need:
The Wincache Extension: This is a Microsoft developed extension that provides platform specific performance boosts. You can download it here. For PHP 7 you need to use version 2.0.0.0 or above.
The SQL Server PDO Extension: Drupal connects to databases by means of PHP PDO drivers. PDO is an acronym for PHP Data Objects. PDO is a lean, consistent way to access databases. This means developers can write portable code much easier. PDO is not an abstraction layer like PearDB. PDO is a more like a data access layer which uses a unified API (Application Programming Interface). Please always use the latest version of the Microsoft PDO driver that matches your environment, you can download the releases from here.
Extensions need to match you current PHP deployment, that is:
- PHP Version
- Thread Safe or Non Thread Safe
- x86 or x64
First we tell PHP where to look for the Extensions:
# ext folder relative to the php.exe binary
extension_dir = ext
Drop both the Wincache and the SQL Server PDO dll's inside the extension folder (c:\PHP\ext\ if you followed this tutorial) and enable them by adding the following two lines to your PHP.ini:
extension=php_wincache.dll
extension=php_sqlsrv_pdo.dll
If you get lost just follow these instructions on how to enable a PHP extension.
In php.ini, use these standard setting for the Wincache extension:
wincache.enablecli=on
wincache.fcachesize=254
wincache.fcenabled=on
wincache.filecount=8000
wincache.maxfilesize=2048
wincache.reroute_enabled=on
wincache.ttlmax=4000
wincache.ucachesize=128
wincache.ucenabled=on
Important: After making any changes to PHP.ini, if you don't see these changes reflected in PHP, make sure to restart the application pool in IIS. This is not always required.
Another important change to do in php.ini is to enable the Opcode cache and to adjust the realpath_cache:
zend_extension=php_opcache.dll

opcache.enable=on
opcache.enable_cli=on
opcache.max_accelerated_files=12000
opcache.memory_consumption=256

realpath_cache_size=5M
realpath_cache_ttl=1800
You can find most PHP extensions already compiled in the PECL repository
http://windows.php.net/downloads/pecl/releases/
Understanding permissions and authentication
There are several intricate security related settings that you can deal with in PHP.
The open_basedir directive should be left empty (as it is by default). This directive is supposed to limit to the specified path any file system operations done by the PHP process. The problem is that this is difficult to setup and maintain (you can have your temporary, web, and other folders spread through several places), but most important, it has a negative performance impact because it invalidates the realpath cache. You can read more about it here.
#open_basedir=
You can still keep your setup secure and isolated by simply using permission based configurations as we will see now.
Most IIS Drupal tutorials (even the old ones from MS itself) will ask you to these settings:
cgi.fix_pathinfo = 1
fastcgi.impersonate = 1
cgi.fix_pathinfo is straightforward and correct, as it does fixes some specific IIS out-of-the-specification path handling.
But using fastcgi.impersonate=1 is not a good deal at all. If you use the default setting (fastcgi.impersonate) will run using the IIS process identity configured in the application pool, and that is what we are used to having in .Net applications:
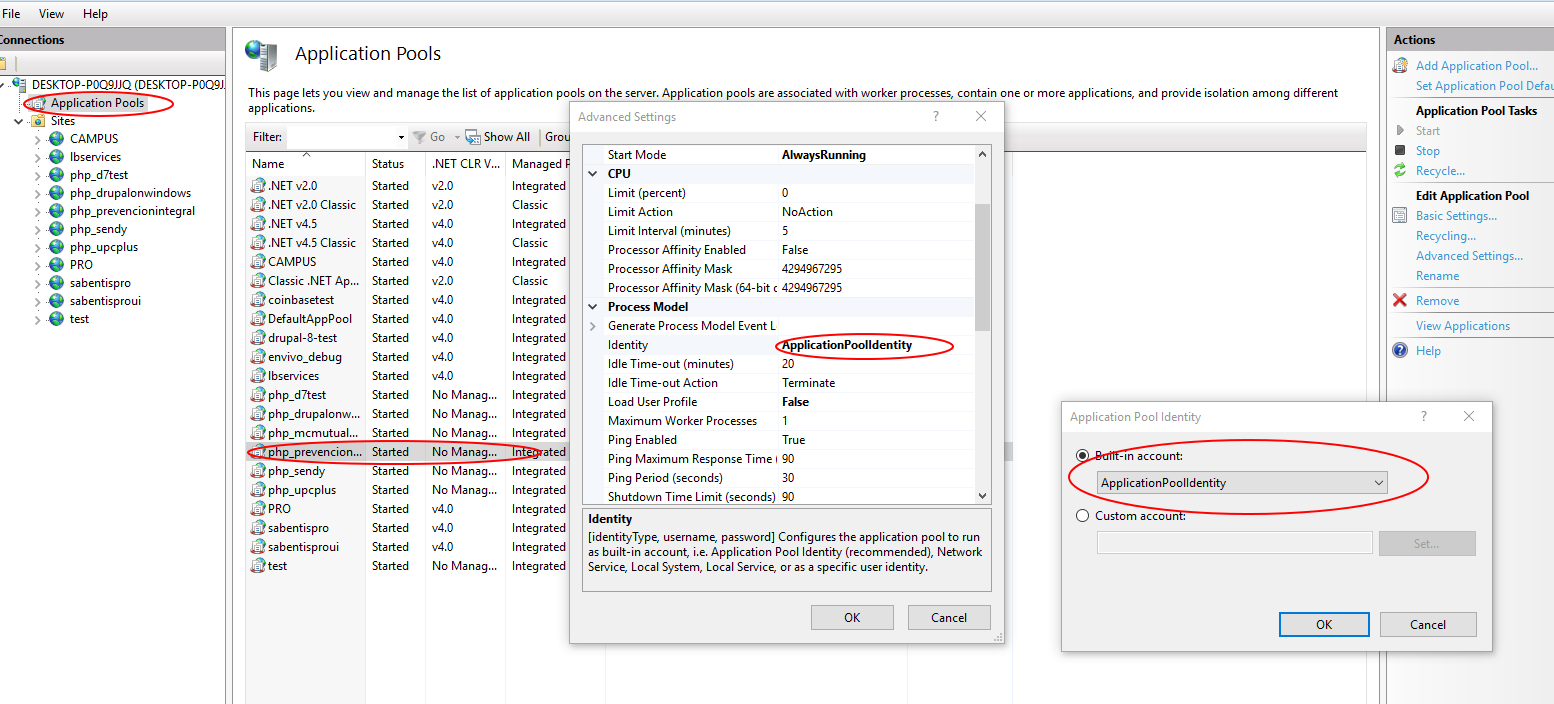
When you use fastcgi.impersonate=1 instead of running as the identity defined in the Application Pool, the php process will use the WINDOWS account (yes this has to do with windows based authentication) and will default to IUSR which is a legacy setup that I do not recommend at all.
There related articles will help you better understand this:
- https://www.iis.net/learn/get-started/planning-for-security/understandin...
- https://forums.iis.net/t/1169633.aspx?IIS+7+5+IUSR+IIS_IUSRS
- http://serverfault.com/questions/50128/what-are-the-iusr-and-iwam-accoun...
This also has an impact on the Load User Profile setting for the application pool:
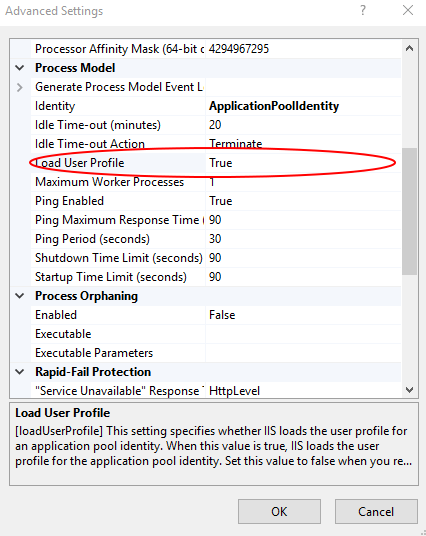
Sometimes (for example when using COM/.Net assemblies, INTEROP or others) you will need to set Load User Profile to true. What this does is load the complete windows account profile when the php process starts. So the user will get - for example - it's own temporary files folder in c:\users\myapplicationpool\temp instead of using the global c:\windows\temp. Now imagine you set Load User Profile to true, and fastcgi.impersonate=1. You might have the IUSR accountr trying to access the temporary folder in c:\users\myapplicationpool\temp for which it holds no read or write access rights.
My recommended setup is to:
- Set Load User Profile to true in the application pool
- Use fastcgi.impersonate=0
You can also use fastcgi.impersonate=1, but then just make sure that the anonymous IIS account uses the application pool identity:

Making SSL Work
In order for Drupal to request external data from SSL services (such as Drupal updates or translations) you need to setup the certificate store that PHP uses. You can see more details about this here.
You need to download the latest certificate file from this link http://curl.haxx.se/ca/cacert.pem and store it somewhere in your system, for example in c:\php\cacert.pem. Then in you php.ini:
curl.cainfo = "[pathtothisfile]\cacert.pem"
Preparing the Database and Installing the SQL Client
I will asume that you already have the knowledge and tools to setup and administer a SQL Server Database. Create a new database named 'mydrupal', and make sure that he database is created using a unicode case-insensitive accent-insensitive collation (for example the default SQL_Latin1_General_CP1_CI_AI).
You can also use Drupal with an Azure SQL database.
You can also find many online tutorials that will guide you through installing an SQL Server engine:
- Step by Step Installation of Microsoft SQL Server 2012 - SlideShare
- SQL Server 2012 - Installation step by step - YouTube
To prevent any future headaches, make sure that you test your connection to the Database (username, password, name, port, etc.) using SQL Server Management Studio from the same box that is hosting the Website, and that the user you will be using to connect to the database has privileges to create/alter/delete database objects such as tables and indexes.
You must also install in the box that will be connecting to the database (the one hosting your webserver) the SQL Server Native Client.
Microsoft has been very bad at making finding the installer for this component easy as it used to be a stand alone element, but is now part of the SQL Server Feature pack. This pack has many files, but the one you are looking for is SPA\x86\sqlncli.msi. (there is also a x64 version of it in the package).
See detailed instructions on how to obtain this component here.
The SNA (Sql Server Native Client) is being deprecated in favour of the Microsoft® ODBC Driver 11 for SQL Server. You should find the latest version of the ODBC driver and install it. The ODBC driver is also used when connecting from Linux.
As of this writing the latest ODBC driver version in 13.1, and you can download it from here.
Composer and GIT for Windows
In order to install and maintain Drupal we are going to need some special tooling.
Composer is a dependency manager for PHP. Composer will manage the dependencies you require on a project by project basis. This means that Composer will pull in all the required libraries, dependencies and manage them all in one place.
To install composer on Windows you need to download and run the Composer-Setup.exe file from the composer website.
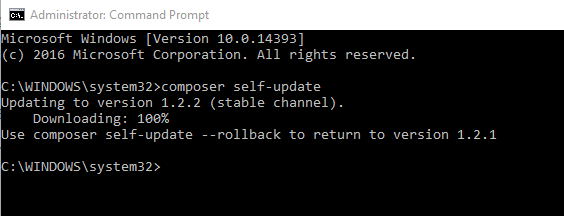
Once composer is installed you will be able to call composer commands from your command prompt. For example, to update composer to the latest version run composer self-update:
Other tools that are not necessarily used in this tutorial, but very helpful (and mandatory if you are going to do something serious):
- Git for Windows: version and source control
- Tortoise GIT: friendly UI for GIT
- WinMerge: used to compare files
- Notepad++: simple text editor
Installing Drupal
Drupal 8 is not just something that you "unzip" into a folder and it's ready to go (like it used to be with Drupal 7). Drupal 8 needs to go through a "build" process. This makes maintenance, upgrades and dependency management much more convenient and reliable.
We recommend to stay away from pre bundled Drupal packages such as Acquia Drupal, or Acquia dev desktop. You don't know/learn and have no control of what happens behind the scenes with those setups.
To speed up composer dependency loading, install the prestissimo package globally:
composer global require "hirak/prestissimo:^0.3"
The installation and maintenance workflow proposed here is just one of many possible workflows, and is based on drupal-project.Open a command prompt, browse to your data disc and install a composer based Drupal 8 project:
cd /d d:\
composer create-project drupal-composer/drupal-project:8.x-dev
This will pull the latest development version of Drupal 8 into the folder:
d:\drupal-project\
We now need to point our IIS site to the webroot in D:\drupal-project\web:
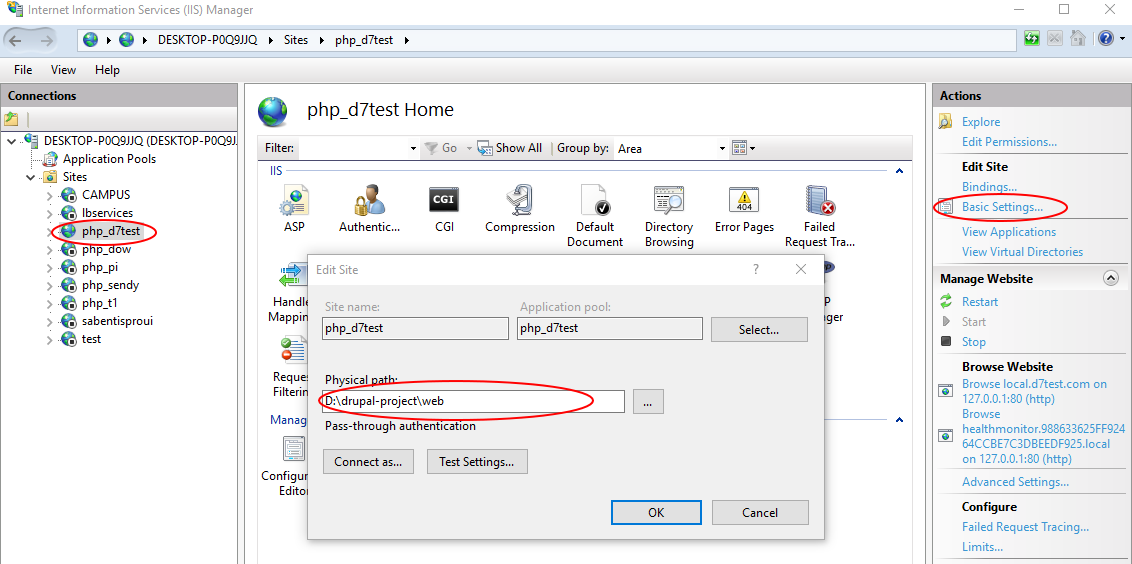
After doing so you will be able to browse your local site at http://localhost:8080/ and see the Drupal installer:

We are also now going to setup the temporary directory settings, otherwise Drupal will fail to properly run. You can change this later, but as default, Drupal will try to store temporary files in "sites/default/files/tmp" so we need to make sure we have a valid directory:
mkdir d:\drupal-project\web\sites\default\files\tmp
In order to install on MS SQL Server we need to pull in the Drupal Sql Server module from Drupal.org. Although we could do that manually, it's easier using composer (and that is why we are using composer all along).
Before being able to install drupal contrib projects from Drupal.org you need to tell composer where to look for them using this command:
composer config repositories.drupal composer https://packages.drupal.org/8
Then open a command prompt and run the following commands:
cd /d d:\drupal-project\
composer require drupal/sqlsrv:~2.0
Unfortunately, database drivers have a special category in Drupal and you need some extra step to get the driver detected by Drupal, you need to copy the "drivers" folder that is inside the module to the root of the website:
xcopy /S /I /E %cd%\web\modules\contrib\sqlsrv\drivers %cd%\web\drivers
You can automate this task as part of your build process by modifying your composer.json file and make the post-update-cmd entry look like this one:
        "post-update-cmd": [
            "DrupalProject\\composer\\ScriptHandler::createRequiredFiles",
			"xcopy /S /I /E /Y web\\modules\\contrib\\sqlsrv\\drivers web\\drivers"
        ]
Remember that, whenever you want to update the driver, it is what is in /web/drivers what matters, not the code in /web/modules/contrib/sqlsrv. With the post-update-cmd command we have just added, the latest code will be pulled from the repository and then updated into the right location everytime you run a composer update command.
If you are going to store your project on a git repository, make sure that you do not commit in your vendor directory neither the copied drivers folder, by adding this to your .gitignore file:
# Do not commit database drivers
/web/drivers/lib/Drupal/Driver/Database/sqlsrv
If you now browse to the Drupal install and try to go forward with the installation, you will see the SQL Server option:

If you put your database details and credentials, and try to install you will get the following error:
Failed to connect to your database server. The server reports the following message: The PhpMssql library is not available.
This is because the 8.x-2.x branch of the Drupal SQL Server module needs the PhpMssql component. There is also a community maintained 8.x-1.x branch that you can use and has no external dependencies (AKA free), simply go back a few steps and use 1.0 instead of 2.0 in the composer require command.
The 8.x-2.x is widely tested, actively supported, Linux compatible and with much more better performance and reliability.
You can bring in the PhpMssql library using a fully integrated composer build process, just run the following commands:
# Replace username and password with your gitlab credentials
composer config repositories.1 git https://username:password@gitlab.com/david-garcia-garcia/mssql.git
composer require david/mssql
You can also deploy it manually by following the next steps.
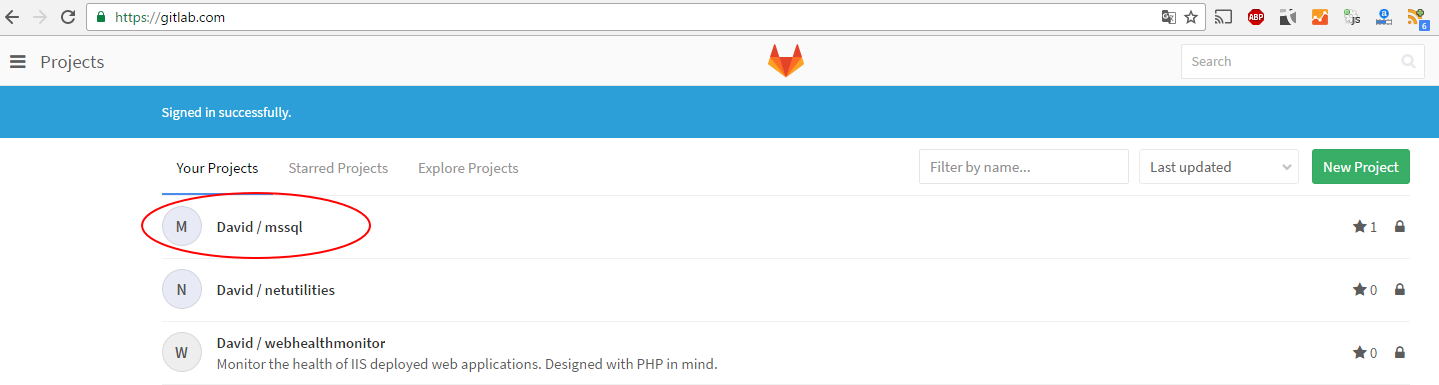
Once you have bought the PhpMssql library login to your gitlab account and look for the mssql project:
Then download the project source:

Then unzip the contents of the file into the following directory:
D:\drupal-project\web\drivers\lib\Drupal\Driver\Database\sqlsrv\mssql
You should see a folder structure such as this:

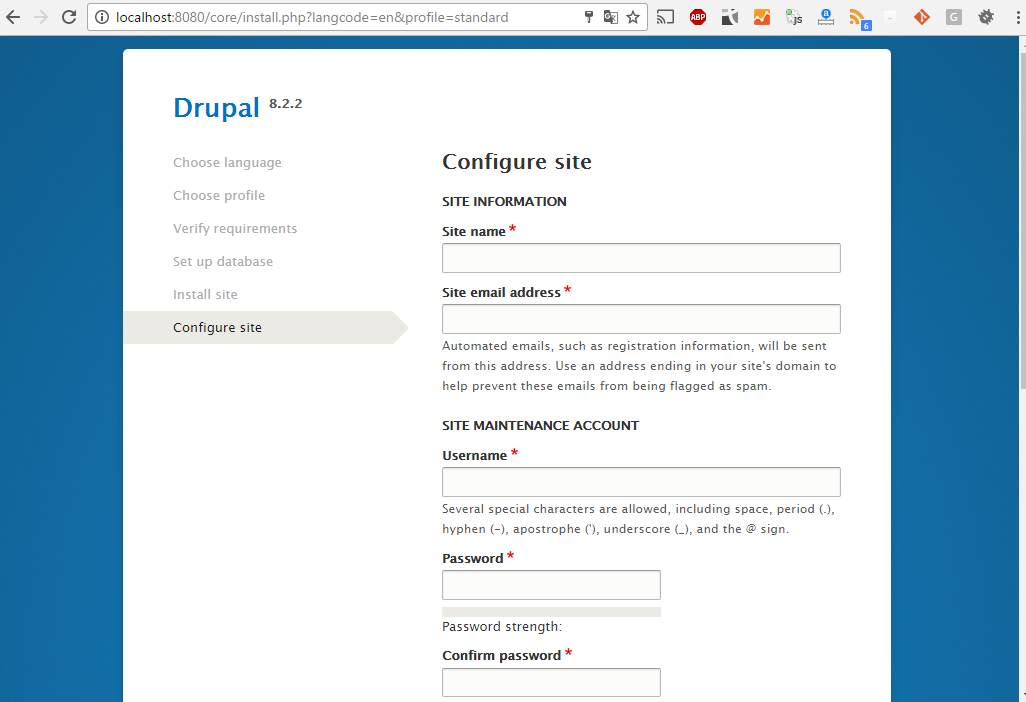
After this you should be able to go through the Drupal install process (aprox. 30 seconds duration) and access your new Drupal site! (note that using the 8.x-1.x branch of the driver makes the install process take a very long time, be patient as it should be finally able to complete itself):
After install you might be greeted with an unpleasant css-less page:
Don't worry, this is due to a special condition where the Drupal installer is unable to automatically create the temporary files directory. Make sure that you have a "tmp" file inside "web/sites/default/files":
mkdir %cd%\web\sites\default\files\tmp
Navigate to the performance page "http://localhost:8080/admin/config/development/performance" and push the "Clear al caches button".
You can also completely install the Drupal site in a completely unnatended manner using the Drupal Console.
The Drupal Console is already installed as a dependency in our project thanks to the composer-drupal project. The first thing we need to do is create a shortcut for the console command, use the following to do so:
@echo @php "%cd%\vendor\drupal\console\bin\drupal" %* > %cd%/web/drupal.bat
We can now test that the Drupal console works by browsing to the web directory and issuing the Drupal about command:

The Drupal console is a very useful tool to work with your Drupal installation, and to integrate with your Continuous Integration practices.
To install your site with a few commands use the following:
drupal site:install standard --langcode="en" --db-type="sqlsrv" --db-host="127.0.0.1" --db-name="mydrupalsite" --db-user="sa" --db-pass="mypassword" --db-port="1433" --site-name="www.DrupalonWindows.com" --site-mail="admin@example.com" --account-name="admin" --account-mail="admin@example.com" --account-pass="admin" --no-interaction
IMPORTANT: A good practice is NOT to keep your site's files directory, but mount this as a virtual directory. To do so keep reading...
We are going to step back a little, and before installing Drupal setup and properly configure file storage. Your Drupal code should be something volatile - an artifact. But your drupal content (i.e. files uploaded by users) should have a persitent storage. Just like the database does.
Drupal works with 3 directories:
- Files: defaults to (sites/default/files), used by the "public://" stream.
- Private: not configured by default. Used by the "private://" stream, must be configured manually and not exposed to the internet (files to be served through Drupal itself).
- Temp: default to (c:\windows\temp), used by the "temporary://" stream.
[TODO: Revise directory setup.]
Once the destination directories are ready, issue the following commands to tell Drupal where these directories are:
set "storage=d:\drupal-project-storage"

mkdir %storage%\sites\default\files
mkdir %storage%\sites\default\private
mkdir %storage%\tmp\sites\default\private

# Link the public directory to the web structure
mklink /j "%storage%\sites\default\files" "d:\drupal-project\web\sites\default\files"

drupal config:override system.file path.temporary %storage%\tmp\sites\default\private
drupal config:override system.file path.private %storage%/private
drupal config:override system.file path.public %cd%/sites/default/files
MS SQL Server custom function
In order to minimize the friction between MySQL specific code (usually found in contributed modules) and MS SQL Server the SQL Server driver for Drupal deploys some functions that are MySQL specific (such as SUBSTRING, LPAD, MD5, etc.) and non ANSI compliant so that an implementation of them is available for the Drupal runtime.
Some of these functions are deployed using UDF (User Defined Functions) and are automatically deployed by the driver.
Advanced functions need to be implemented using CLR . This is the case of - for example - the GROUP_CONCAT implementation. Note that Azure has discontinued support for CLR on their cloud offerings.
You can find an implementation of GROUP_CONCAT for SQL Server here: https://groupconcat.codeplex.com/
Do not worry if you are missing any of these functions, they are not critical. But it might ring a bell in the future if any contributed module uses them, and you might need to fix the offending code (offending because it is non ANSI compliant).
Applying patches
Drupal is - after all - open source. That means that you might need to apply patches to the current stable code base to fix bugs that are affecting you, or to deploy custom changes to the code itself.
The composer build Drupal project we have been arranging has the tools to automatically have remote patches applied as part of the build process. You can add patches for core, or even for specific modules or vendor components.
Simply add the URL to the patch and the module it belongs to in your composer.json extras.patches entry:
"extra": {
        "patches": {
            "drupal/address": {
                "Drupal Addess fix default syncing": "https://www.drupal.org/files/issues/address_syncing.patch"
            },
		    "drupal/drupal": {
		      "Make PHPUnit work in Simpletest on Windows" : "https://www.drupal.org/files/issues/2294731-39-phpunit-windows.patch",
			  "Make test script properly grab the PHP runtime on Windows" : "https://www.drupal.org/files/issues/use_the_php_binary-2748883-15.patch",
			  "Make simpletest work with contributed database drivers": "https://www.drupal.org/files/issues/simpletest_is_broken_on-2605284-42.patch"
		    }
        }
    }
In this example the patch in "https://www.drupal.org/files/issues/address_syncing.patch" will be automatically applied as part of the build process. If you need to modify or customize any 3d party code (modules, core, etc..) you have two options:
- For small code modifications, deploy them as patches that are applied as part of the build process
- For heavy modifications, fork the remote reposiitory with your own version, and use that instead of the original module
The above example will also bring in some patches for Drupal core itself.
High performance Drupal: Wincache
Although we already have the Wincache PHP extension configured and running, it takes the help of the Drupal Wincache module to make the most out of Wincache (the really important performance improvements come from enabling this module).
Open a command prompt in your project's root and run the following:
composer require drupal/wincachedrupal:~1.0
This will pull in the Wincache module with any other module dependencies it has.
Go to /admin/modules and install the Wincache module:

There is one extra setting that needs to be manually configured in sites/default/settings.php to make the FileCache component in Drupal run on top of Wincache:
$settings['file_cache']['default'] = [
    'class' => '\Drupal\Component\FileCache\FileCache',
    'cache_backend_class' => \Drupal\wincachedrupal\Cache\WincacheFileCacheBackend::class,
    'cache_backend_configuration' => [],
 ];
High performance Drupal: Couchbase
For big websites with high traffic it is recommended not to store cache items in the database, but to do so in an alternate backend such as Couchbase.
http://www.drupalonwindows.com/en/blog/drupal-8-couchbase-integration
(needs update and clarification)
High performance Drupal: Tideways
To keep your site fast you need a tool that will tell you exactly what is slow so that you can do something about it. For Windows users that will be Tideways:
(needs update and clarification)
NetPhp
After installing the Wincache Module you will see the following messages in the status page:

The Wincache modules has some performance optimizations that rely on the availability of the NetPhp library. Besides these out-of-the-box optimizations, deploying the NetPhp allows you to call .Net libraries (.dll files) from within PHP or even code from the .Net framework itself.
To install NetPhp download the netuilities.dll binary into your php runtime folder:
c:\php\netutilities.dll
Then register it with the following command:
"C:\Windows\Microsoft.NET\Framework64\v4.0.30319\regasm.exe" "c:\php\netutilities.dll" /codebase
In your php.ini enable the com_dotnet extension:
extension=php_com_dotnet.dll
Then download the Ajaxmin.dll binary from the either the installer, nuget or build it yourself and drop it into:
d:\drupal-project\web\libraries\_bin\AjaxMin\AjaxMin.dll
d:\drupal-project\web\libraries\_bin\AjaxMin\AjaxMinTask.dll
After this, rebuild the registry by navigating to /core/rebuild.php. Yor status page should now look something like this:

With this you have achieved 2 things:
- Drupal is using a faster and better (more compression) asset minification and aggregation algorithm provided by AjaxMin.
- You now can use the 'netphp' service to consume any .Net binaries
Calling .Net code from PHP
See our Calling .Net from PHP article to:
- Use any .Net binaries (even without COM Visibility) and for any version of the .Net framework.
- Iterate over .Net collections directly from PHP
- Automatic propagation of .Net errors into native PHP exceptions that can be properly handled
- Acces native enums and static methods
- Use class constructors with parameters
- Debug PHP and .Net code at the same time as if it was a single application.
- Specify the location of you binaries, so there is no need to register anything in the GAC and you can have version control along with your application.
By installing the Wincache module (see previous sections) you get an already available NetPhp runtime to write .Net integrations out of the box. The following code will, for example, take a powerpoint file (ppt or pptx) and convert it to a set of images using the Aspose.slides .Net component:
    /** @var \Drupal\wincachedrupal\NetPhp */
    $netphp = \Drupal::service('netphp');

    \Drupal\envivo\Util\UtilsAspose::RegisterAsposeInPhpRuntime($netphp);

    $runtime = $netphp->getRuntime();
    $runtime->RegisterAssemblyFromFullQualifiedName("System.Drawing, Version=4.0.0.0, Culture=neutral, PublicKeyToken=b03f5f7f11d50a3a", "System.Drawing");

    $destination = strtr(PresentacionSlide::UPLOAD_LOCATION, ['[envivo_presentacion:id]' => $this->entity->id()]);
    file_prepare_directory($destination, FILE_CREATE_DIRECTORY | FILE_MODIFY_PERMISSIONS);

    $sourcefile = drupal_realpath($file['tmppath']);

    $presentation = $runtime->TypeFromName("Aspose.Slides.Presentation")->Instantiate($sourcefile);
    $format = $runtime->TypeFromName("System.Drawing.Imaging.ImageFormat")->Png;

    $x = 0;

    /** @var \NetPhp\Core\NetProxyCollection */
    $slides = $presentation->Slides->AsIterator();

    foreach ($slides as $slide) {
      $x++;
      $bitmap = $slide->GetThumbnail(1, 1);
      $destinationfile = $destination . "/slide_{$x}.png";
      $bitmap->Save(drupal_realpath($destinationfile), $format);
      $slide = PresentacionSlide::fromFile($destinationfile);
      $files[$slide->uuid] = $slide;
    }

    $presentation->Dispose();
A piece of code writen in C# like this:
string javascript = "";
Microsoft.Ajax.Utilities.Minifier m = new Microsoft.Ajax.Utilities.Minifier();
Microsoft.Ajax.Utilities.CodeSettings settings = new Microsoft.Ajax.Utilities.CodeSettings();
settings.OutputMode = Microsoft.Ajax.Utilities.OutputMode.SingleLine;
settings.PreserveFunctionNames = false;
string minified = m.MinifyJavaScript(javascript, settings);
Will look like this on PHP:
$minifier = netMinifier::Minifier_Constructor();
$settings = netCodeSettings::CodeSettings_Constructor();
$csssettings = \ms\Microsoft\Ajax\Utilities\netCssSettings::CssSettings_Constructor();
$settings->OutputMode(\ms\Microsoft\Ajax\Utilities\netOutputMode::SingleLine());
$settings->PreserveFunctionNames(FALSE);
$settings->QuoteObjectLiteralProperties(TRUE);
$result = $minifier->MinifyStyleSheet($css, $csssettings, $settings)->Val();
What to do next
If you properly followed these instructions, you should have a smooth and fast Drupal website and have a basic understanding of how the different components needed to run Drupal on Windows interact, but as your site gets bigger and more complex, you will need more advanced configuration.