Add new comment
Installing Magento on Windows and IIS
In this post we will explore the details of deploying Magento E-commerce on Windows and IIS. We will be focusing exclusively on elements and configurations relevant to that software stack, but the rest of the installation and deployment process will still be briefly covered. Note that being Magento a commercially supported product, the offical setup guides are detailed very thoroughly.
- The tooling
- Preparing IIS
- The build process and getting the code
- Making the code IIS ready
- Setting up the database
- Deploying the application
- The Magento installer
- Custom modules
- Changing the Base Url
- Changing the root
- Upgrading Magento
- Scheduled tasks
- Developer mode
- Performance monitoring with Tideways
- Related readings
The tooling
In order to prepare your webserver and/or working environment the following tooling is recommended:
Chrome:
$Path = $env:TEMP; $Installer = "chrome_installer.exe"; Invoke-WebRequest "http://dl.google.com/chrome/install/375.126/chrome_installer.exe" -OutFile $Path\$Installer; Start-Process -FilePath $Path\$Installer -Args "/silent /install" -Verb RunAs -Wait; Remove-Item $Path\$Installer
Set proper execution policy for powershell scripts:
Set-ExecutionPolicy Unrestricted
For all environments
- Chocolatey package manager
- Notepad++
- IIS Chef
- Visual Studio 2013 Redistributable
- Visual Studio 2015 Redistributable
- .Net Framework 4.5.2
- MySQL or MariaDb
A global PHP runtime:
Instead of the MSI installer, you can also use chocolatey to deploy a global PHP runtime:
https://chocolatey.org/packages/php
choco install php --version 7.0.6
This is the PHP runtime we will be using system wide to run composer and other PHP based tools, not to run the application (Magento) itself. Once installed, make sure to update the default php.ini file to these recommended settings.
Chocolatey's PHP runtime can be found in
C:\tools\php
extension_dir=ext
extension=php_bz2.dll
extension=php_curl.dll
extension=php_fileinfo.dll
extension=php_gd2.dll
extension=php_gettext.dll
extension=php_intl.dll
extension=php_mbstring.dll
extension=php_openssl.dll
extension=php_pdo_mysql.dll
extension=php_soap.dll
extension=php_xmlrpc.dll
extension=php_xsl.dll
extension=php_enchant.dll
extension=php_exif.dll
zend_extension=php_opcache.dll
curl.cainfo="C:\Windows\Temp\cacert.pem"
openssl.cafile="C:\Windows\Temp\cacert.pem"
error_log="C:\Windows\Temp\PHP.log"
realpath_cache_size=5M
realpath_cache_ttl=1800
memory_limit=2048M
max_execution_time=600
opcache.enable=1
opcache.memory_consumption=256
opcache.max_accelerated_files=25000
opcache.revalidate_freq=10
opcache.interned_strings_buffer=16
opcache.validate_timestamps=1
opcache.enable_cli=1
opcache.file_cache_only=0
opcache.file_cache="C:\Windows\Temp"
Note that - for now - you will have to manually download the cacert.pem file and place in the right location:
This is very important in order for the PHP runtime to make SSL connections to remote servers (i.e. to pull packages from composer.org).
For development environments / build servers
Preparing IIS
To install magento you will need IIS with the FastCgi component installed.
Install IIS and FastCGI following these instructions: https://technet.microsoft.com/en-us/library/cc753077(v=ws.10).aspx
You also need to enable the URL Authorization IIS module, that is not enabled by default:
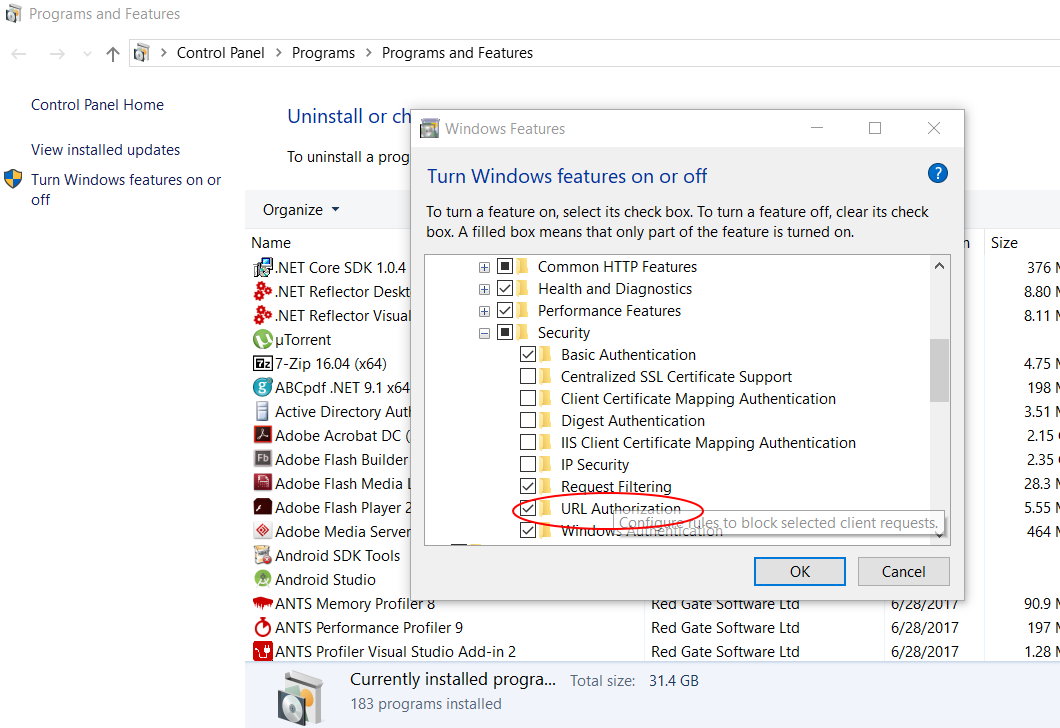
To enable FastCGI on IIS from command line open an admin prompt and use the following command:
DISM.EXE /enable-feature /online /featureName:IIS-CGI /all
You also need to install the URL Rewrite component for IIS, very easy with chocolatey, simply run this command:
choco install urlrewrite -y
Another interesting feature for IIS that can come in handy when projecting complex deployments is IIS's Application Request Routing:
choco install iis-arr -y
The build process and getting the code
The official Magento professional (integrator) deployment guide is here:
http://devdocs.magento.com/guides/v2.0/install-gde/prereq/integrator_ins...
This is the preferred build strategy if you are going to setup CI (Continuous integration), and the one recommended by Magento for integrators and development shops.
The first step is to checkout and build magento. Magento uses it's own GIT repository to hold both the source code and the extension packages, so you will need to open an account in Magento.com and obtains authentication keys to be able to pull packages with composer:
http://devdocs.magento.com/guides/v2.0/install-gde/prereq/connect-auth.html
To checkout the code use the command:
composer create-project --repository-url=https://repo.magento.com/ magento/project-community-edition magento
If you want to install the Enterprise Edition (requires license and permissions):
composer create-project --repository-url=https://repo.magento.com/ magento/project-enterprise-edition magento
Important note
The current IIS compatiblity has been checked up to 2.1.10 version of Magento. To install a specific version (i.e. the latest 2.1.x release) use the following command:
composer create-project --repository-url=https://repo.magento.com/ magento/project-enterprise-edition magento 2.1.*
In order to access the enterprise edition, the provided credentials must belong to a Magento marketplace account that has a license for Magento Enterprise. If you have another registered credentials the project will not be visible and throw a not found error:

You can update your keys any moment with the following command:
composer global config http-basic.repo.magento.com <public_key> <private_key>
You will be required a username and a password on your first clone, use here a public and private key pair obtained from Magento's Marketplace. Navigate to Marketplace, My Profile, My Access Keys.
If you are using keys for an account that has en enterprise license, yet you still cannot see the repository, get in touch with Magento support for your account and ask them to provide access to the EE repository.
To expedite composer operations, you can globally install the prestissimo plugin:
composer global require hirak/prestissimo
This will make composer pull remote dependencies in parallel, making build processes much much faster.
In order to install/update Magento you need to add these not very usual extensions to your global PHP runtime: php_intl.dll and php_xsl.dll
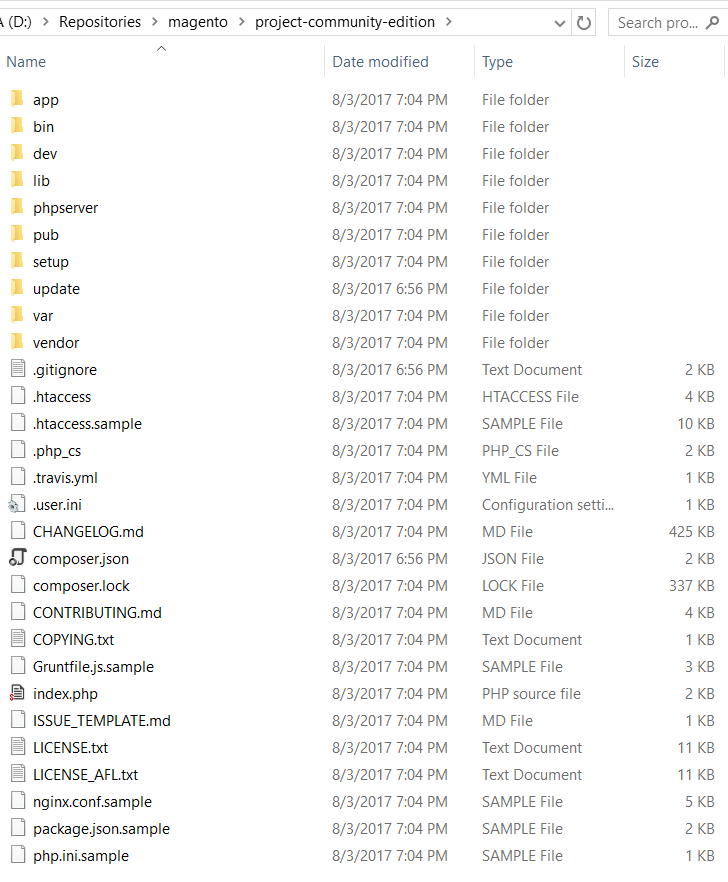
After pulling the code you should have a nice and shiny new Magento root directory:
Next step after the build is to push the code to a GIT repository. This is very important in order to track any changes, and to have a continuous integration deployment process.
Open your GIT bash, init and push the repository with the following commands, replace the remote, branch names and commit message to your own repository:
git init
git checkout -b 1.x
git add -A
git commit -m "Initial commit"
git remote add origin https://github.com/david-garcia-garcia/magentoiis.git
git push -u origin 1.x
To avoid having to input the credentials to your private remote repository on every GIT operation, register local SSH keys, see this tutorial:
http://support.beanstalkapp.com/article/915-generating-and-adding-ssh-ke...
Making the code IIS ready
The first thing that needs to be fixed to run Magento on IIS is to add host configuration files equivalent to the ones used in Apache (.htaccess) for IIS (web.config).
These changes, among others, are all available as a pull request in Github.
https://github.com/david-garcia-garcia/magentoiis/pull/2/files
To apply the changes directly to your codebase use the following command to download and apply the patch:
powershell -command "(New-Object Net.WebClient).DownloadFile('https://patch-diff.githubusercontent.com/raw/david-garcia-garcia/magentoiis/pull/2.patch','%cd%\patch.patch')"
git apply patch.patch
del patch.patch
Running this command at a later time will file as the patch is already applied. If the pull request gets updated, you can see the change log here to apply them manually:
https://github.com/david-garcia-garcia/magentoiis/pull/2/commits
The default magento package comes bundled with a .ini.user file in the root. This is designed for shared hosting or shared PHP runtimes. You can (and should) remove this file if you are not using shared hosting or planning to share PHP runtimes between applications. When deploying PHP applications with Chef, every application gets a 100% isolated PHP runtime, so there is no need for this .user.ini file.
Setting up the Database
Magento will only run on MySQL compliant databases, that is, MySQL or MariaDb.
To manipulate your MySQL instance I recommend using MySQL Workbench. This is a tool very similar to Microsoft SQL Server Management Studio but for MySQL.
Before going through the setup process you will need to manually provision a MySQL database and credentials for Magento to connect to the database server.
Make sure that when you provide Magento with the database engine host, you use an IP address, not a hostname (i.e. 127.0.0.1 instead of localhost). This will make connecting to the engine way faster, see details here.
Deploying the Application
Now that we have the code and the database, we need to "mount" our application on the web server (IIS - Internet Information Services).
To build a reliable continuous integration setup the process that installs your code should be fully automated. A possible approach to this is using Powershell based scripting.
A trend in the industry is to have infrastructure-as-code based deployments. This basically means that whatever setup your application needs in the server - such as the specific IIS runtime configuration - is described inside the application code itself, making deployments versionable, traceable and reliable. I.E if your application needs a cron job, a storage directory or a database store, this should be described in the code.
If you followed the previous steps to setup your Magento source code you will see a \chef folder in your root directory. This chef folder contains a file (chef.yml) that describes what configuration and runtime the application needs to run, including the full IIS configuration and setup, provisioning storage or even scheduled tasks. To deploy the application using this configuration files we will be using IIS Chef.
There are several advantages to deploying in such a way:
- Full automation for the deployment process
- Immediate (AKA 0 downtime) application code updates (new versions of the application are deployed in an isolated manner and then switched)
- Versioning of the environment and setup
- Automatic development environments (because the tooling knows what storage the application is using, it can clone disk and database to quickly provide clones of the production environment for development purposes)
- Hides complexity of the setup. I.e. a proper security setup for PHP applications is tedious to deploy manually, but is 100% transparent and done by default by the deployment tool
Currently Chef only supports MS SQL Server database management and provisioning, so any MySQL related management for Magento will need to be done manually. Also environment cloning will only work for disk storage.
Chef can deploy artifacts from different sources, including AppVeyor and FTP. For the scope of this tutorial, we will be deploying from a local source, that is, a local folder containing the source code for our application. Local deployments are also useful for development environments. On a real production environment artifacts will be pulled mostly from build servers such as AppVeyor.
To deploy Magento using Chef open a Powershell prompt as administrator and run the command:
Invoke-ChefAppDeployPath "c:\mymagentosourcepath\" myapplicationname -MountStrategy copy
Chef can use several mount strategies for artifacts. It will default to "link":
- original: IIS site is pointed directly to your artifact's folder. Not recommended.
- link: A symlink is created that points to your source folder. Recommended for local development environments.
- copy: The source is copied to a new location (automatic) and then deployed to IIS. Slower, but recommended for production environments.
Once an application is deployed, it's deployment settings are stored and versioned internally by Chef. To trigger further deployments with the exact same configuration use:
Invoke-ChefAppRedeploy myapplicationname
The first time you deploy the application it might be slow. Runtime files - such as the PHP runtime and extensions - are dowloaded from the external official repositories and might take a while to retrieve depending on the speed of your network. Chef has an internal cache so any future deployments will be faster as long as they use a similar runtime configuration:
runtime:
      - {type: 'dl', uri: 'http://windows.php.net/downloads/releases/archives/php-7.0.17-nts-Win32-VC14-x64.zip', maps: {'*' : 'php/'}}
      - {type: 'dl', uri: 'http://windows.php.net/downloads/pecl/releases/xdebug/2.5.3/php_xdebug-2.5.3-7.0-nts-vc14-x64.zip', maps: {'php_xdebug.dll':'php/ext/php_xdebug.dll'}}
      - {type: 'dl', uri: 'https://ci.appveyor.com/api/buildjobs/7b47bfc24eynberd/artifacts/x64%2FRelease%2Fphp_tideways.dll' , maps: {'x64%2FRelease%2Fphp_tideways.dll':'php/ext/php_tideways.dll'}}
      - {type: 'dl', uri: 'http://windows.php.net/downloads/pecl/releases/igbinary/2.0.1/php_igbinary-2.0.1-7.0-nts-vc14-x64.zip', maps: {'php_igbinary.dll': 'php/ext/php_igbinary.dll'}}
      - {type: 'dl', uri: 'http://windows.php.net/downloads/pecl/releases/wincache/2.0.0.8/php_wincache-2.0.0.8-7.0-nts-vc14-x64.zip', maps: {'php_wincache.dll': 'php/ext/php_wincache.dll'}}
Chef keeps track of deployed applications. If you need to redeploy the application (i.e. if you made changes to the deployment configuration) run the command:
Invoke-ChefAppRedeploy myapplicationname -Force
As you can see in the sample chef.yml file, the site is exposed through a local host binding:
    bindings:
      local:
        hostname: 'local.magentocommerce.com'
        port: 80
        interface: 'local'
That means that right after the deployment you will be able to browse your Magento site through the URL:
http://local.magentocommerce.com
You can also quickly get access to the exact PHP runtime of the deployment through the console by using the tooling deployed by Chef:

If you double click on launch_console.bat you will have a command prompt with the PHP runtime configured to be the exact same one as the one used in the deployment (not your global PHP runtime for example).
Magento has console based tooling, so this is very useful.
If you are doing a manual (non-chef) deploy, make sure that your application user has proper permissions for symlink creation as this is required by Magento's developer mode on-the-fly static content generation:
- https://docs.microsoft.com/en-us/windows/device-security/security-policy...
- https://social.technet.microsoft.com/Forums/windowsserver/en-US/d19ea008...
(Chef already takes care of this and other security/permission setup configurations out-of-the-box).
The Magento installer
The install process on the official guide is extremely detailed, just follow step by step:
http://devdocs.magento.com/guides/v2.0/install-gde/install/web/install-w...
Take care of the following settings during the install process:
Step 3: Web Configuration
Enable Apache Rewrites: when you enable Apache rewrites you are telling Magento that your webserver is able to handle URL Rewrites, and that any request to a non-friendly URL should be redirected to it's friendly version. Because we are using IIS URL Rewrite module, we do have such a capability and enabling this settings is recommended for SEO purposes. Note that IIS rewrite rules are implemented through the web.config files, so these might get out of sync with Magento's .htaccess files as the web.config files are not officially supported.
Session Save: By default you are offered by Magento to store session data in either files or database . Our recommendation is to keep session data away from your main database. Use file storage for an initial install, and then upgrade to something more scalable and isolated such as Redis when needed. See:
- http://devdocs.magento.com/guides/v2.0/config-guide/redis/redis-session....
- https://magento.stackexchange.com/questions/93495/what-should-i-choose-s...
After the install
Make sure you enable developer mode for the site:
php bin/magento deploy:mode:set developer && php bin/magento cache:clean
After the install you will might be greeted with an unpleasant screen, or some scripts might fail to load:

For some reason (such as NOT having set developer mode during the install process), the installer will sometimes fail to create the required static content files, see the following reports:
- https://community.magento.com/t5/Installing-Magento-2/CSS-not-loading-in...
- https://mage2.pro/t/topic/259
This is reported as known bug here:
To workaround this deploy static content manually. Magento comes with a console based engine. To deploy static content manually use the following command:
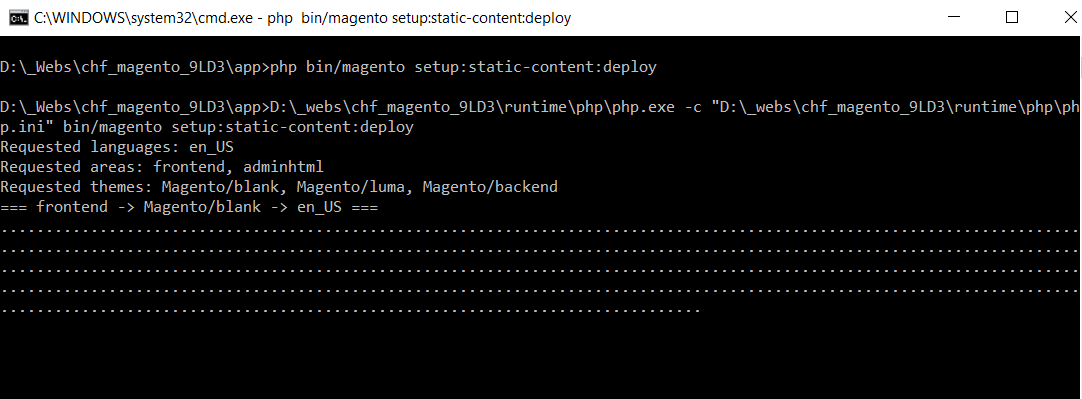
php bin/magento setup:static-content:deploy
You must be careful with the previous command as the PHP runtime that will be used might not be the one you expect.
To make sure you run the command line using the exact same PHP environment as the one deployed by chef for the website, navigate to the runtime folder for the site and double click on launch_console.bat:

If you already have an open prompt, execute the setenv script:
D:\your_deployment_path\runtime\include_path\setenv.bat
Now run the command from the root of your Magento source:
D:\_Webs\chf_magento_9LD3\app>php bin/magento setup:static-content:deploy
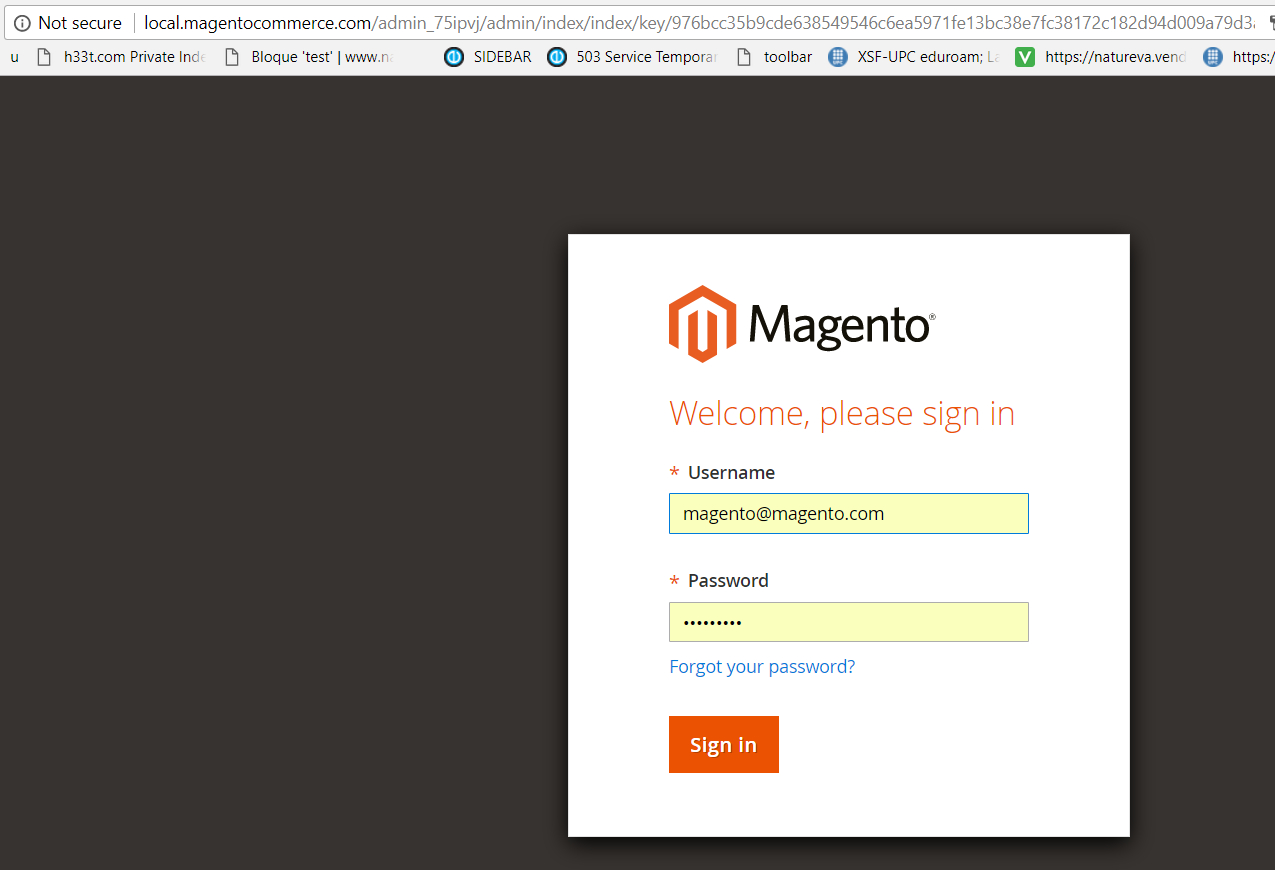
It will take a while, but once finished you will see all generated static files in your /pub/static directory, refreshing your browser should led to a properly rendered login screen:
Once installed you will find the configuration/setup settings (i.e. database connection information and other critical startup data) in app/etc/env.php

If you are going to use continuous integration practices it is recommended that you commit these files to the repository, and modify them so that runtime settings are read from the runtime itself (i.e do not commit database credentiales, but read them from the environment configuration).
Custom modules
To write custom modules for Magento 2 use any of the online available tutorials:
- https://www.mageplaza.com/magento-2-module-development/
- http://inchoo.net/magento-2/how-to-create-a-basic-module-in-magento-2/
- https://magento.stackexchange.com/questions/122287/how-to-create-simple-...
If you have deployed Magento 2 using Chef, there is a bug in Magento that will prevent it from discovering custom modules because of the /app/etc dir being mounted on a Symlink.
To overcome this issue, apply the changes from this commit:
After doing so, issue the following command:
composer update
Changing the base_url
Magento is designed to work on a single domain name. This strictly means that you will be able to properly run Magento on a specific hostname only. During setup, the base_url is configured to be the one used in the browser during install.
First add the new hostname in the chef configuration bindings and redeploy the application:
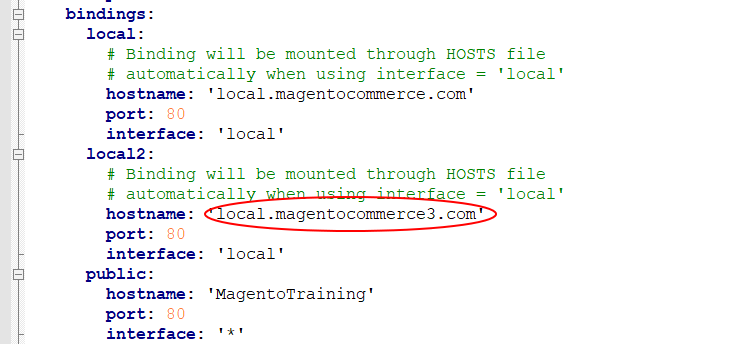
When you are done with the changes, redeploy the configuration:
Invoke-ChefAppRedeploy myapplicationname -Force
If you need to change the hostname for your application run these commands:
php bin/magento setup:store-config:set --base-url="http://local.magentocommerce3.com/"
php bin/magento setup:store-config:set --base-url-secure="https://local.magentocommerce3.com/"
php bin/magento cache:flush
rmdir "var/cache" /s /q
rmdir "var/generation" /s /q
rmdir "var/page_cache" /s /q
Make sure that the hostname you setup in your configuration is lowercase. Otherwise you will be trapped in an infinite redirection loop when trying to access magento.
https://magento.stackexchange.com/questions/134245/base-url-change-magento2-1
Changing the root
The default chef file used in this tutorial mounts Magento on the root of the source:
    mounts:
      root:
        root: true
        path: '/'
Unfortunately, due to some autoloading issues in the installer, this is the only way to make the installer work. The recommended mount path for magento is the pub directory:
    mounts:
      root:
        root: true
        path: '/pub/'
Once installed you can run magento without issues using the /pub/ directory as the root for the application.
Upgrading Magento
To upgrade your Magento version follow the official instructions from:
http://devdocs.magento.com/
If you followed this guide and deployed using Chef, note that there is a logical separation between the "artifact" (that is the source code of your application) and your deployed code.
On step 2 of the official guide:
Change to the directory in which you installed the Magento software.
For example,
cd /var/www/html/magento2
You should move to the location where you have your "artifact". After running step 3 (composer require / compose update commands) you should run a redeploy command to move the new code to the deployed artifact with the Invoke-ChefAppRedeploy path:
Invoke-ChefAppRedeploy magento -Force
The rest of the steps should be run directly on the production site's console.
Scheduled tasks
As many other PHP based applications, you need to setup an external cron job to trigger execution of maintenance/cron tasks.
http://devdocs.magento.com/guides/v2.0/config-guide/cli/config-cli-subco...
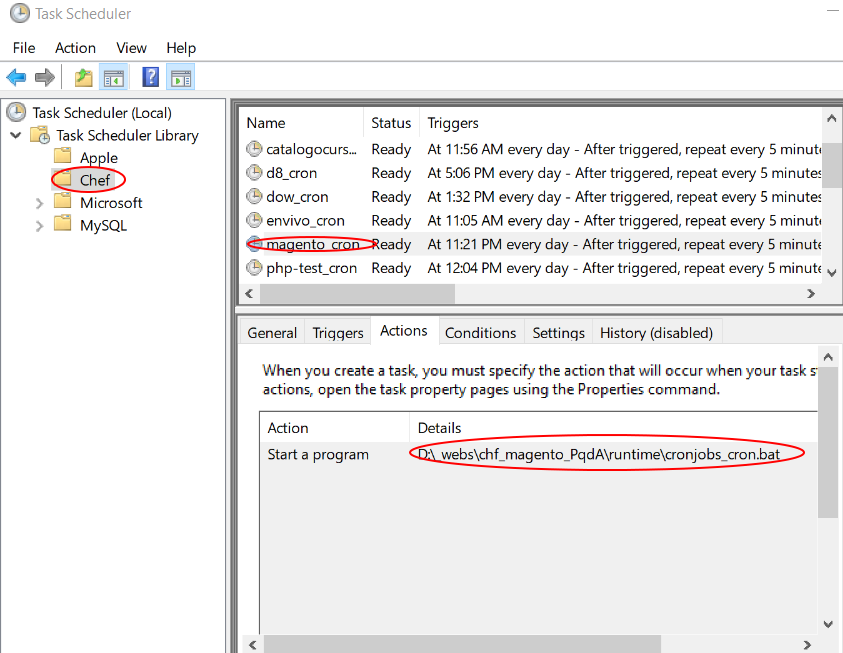
These have been automatically setup by Chef and are specified in the configuration file:
  cron:
    type: 'scheduler'
    commands: ['php bin\magento cron:run', 'php bin\magento setup:cron:run', 'php update\cron.php']
    frequency: 5
You will see that the system's task scheduler has been used by Chef to trigger the cron commands:
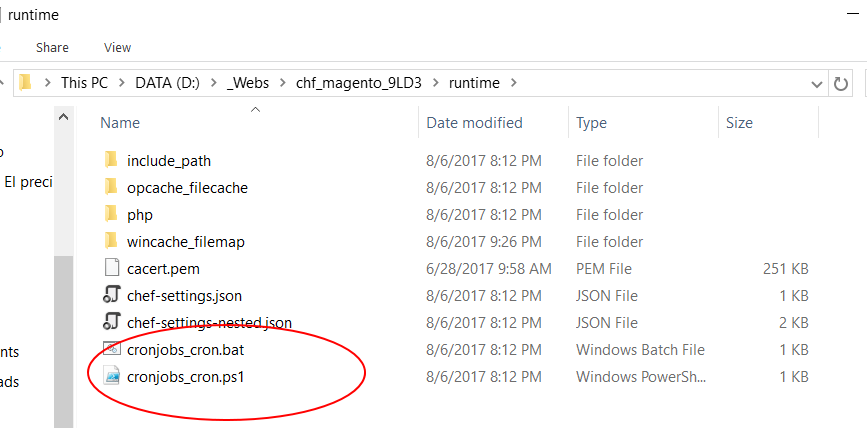
The actual scripts can be found in the deployment's runtime folder, where you can run them manually:
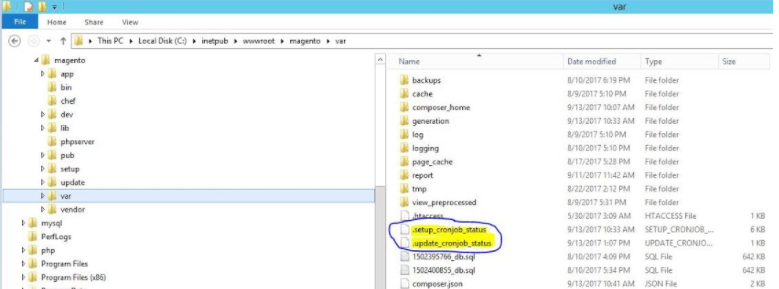
To verify that the scheduler cron jobs have properly run check your "var" directory, two files should be generated:
Enabling the developer and production modes
Magento has several working modes (default, developer, production). See details here:
http://devdocs.magento.com/
To change the mode you can use command line instructions:
http://devdocs.magento.com/guides/v2.1/config-guide/cli/config-cli-subcommands-mode.html
You should work in developer mode when doing "development" (working on code, theming and the like). Use production for live sites.
Setting environment variables
There are several Magento settings that you can configure through environment variables. Such as:
- http://devdocs.magento.com/guides/v2.1/config-guide/bootstrap/mage-dirs....
- http://devdocs.magento.com/guides/v2.1/config-guide/bootstrap/mage-profi...
If you ever need to configure an environment variable consistently for a PHP runtime, you can use the Chef configuration to do so:
  php:
    type: 'php'
    # List of environment variables. This will be consistently configured
    # in the PHP runtime through the auto_prepend ini directive, so that all environments
    # (fastcgi + console) receive this variables.
    environmentVariables:
      'ENV1': 'ENV1'
      'ENV2': 'ENV2'
      'ENV3': 'ENV3'
Performance monitoring with Tideways
The sample chef file used when building Magento already pulls and configures the Tideways PHP extension. Yet you will need a few things to get it running.
First thing is to sign-up with Tideways (free 30 day trial available) and obtain an APP Key that you must place in your Chef configuration file:

You also need to tell Tideways what framework you are using (unless you want to develop custom instrumentation), do this through the framework ini setting:
- {type: 'ini','key':tideways.framework , 'value': 'magento2'}
You can see the available framework support here:
https://tideways.io/profiler/docs/setup/installation
Make sure you redeploy the application after making these changes with:
Invoke-ChefAppRedeploy myapplicationname -Force
To send data to the remote Tideways servers you need to install the daemon, which is available through a Chocolatey package:
choco install tidewaysdaemon -y --version 4.0.1
Besides the PHP extension configured in PHP, you need to make sure that the Tideways PHP library (Tideways.php) is added to all your requests. You can add the Tideways.php to your repository and use php's auto_prepend_file or, even easier, add the package as a composer dependency. To do so, open a command line on your artifact's source path and run the following command (note after running the command redeploy the application for the changes to take effect):
composer require tideways/profiler
To manually collect traces you can use the very useful Chrome Tideways extension:
https://tideways.io/profiler/blog/chrome-extension-to-start-tracing
Related readings
To elaborate this guide, the following literature has been reviewed to summarize key elements to consider when deploying on Windows and IIS.
- https://community.magento.com/t5/Installing-Magento-2/Is-it-possible-to-...
- http://www.gadjev.com/2016/02/08/installing-magento-ce-2-0-on-windows-se...
- http://invosoft.co.uk/post/2011/07/20/Installing-Magento-eCommerce-on-Wi...
- http://www.mochasupport.com/kayako/index.php?_m=knowledgebase&_a=viewart...
- http://tarunjadav.blogspot.com.es/2013/09/magento-run-on-iis-and-install...
- https://magento.stackexchange.com/questions/17116/wincache-magento-setup
- https://blog.winhost.com/how-to-install-magento-2-1-2-on-winhost-iis/
- http://www.rapidcommerce.eu/en/blog/2012/05/magento-lamp-vs-wimp-running...
- https://magento.stackexchange.com/questions/153535/magento2-in-windows-i...
- https://blogs.msdn.microsoft.com/azureossds/2015/05/01/magento-web-confi...

